Update Blender through the same source that installed your copy: download a new installer or archive for a manual installation, or let Steam, Microsoft Store, Snap or your Linux package manager update its package. Before changing release lines, keep the old app, back up its settings and project, then import previous preferences when the new version offers them. Copying an add-on preserves its files; it doesn't establish that the add-on works in the new release.
I'd keep both versions until a representative project has survived an edit, a save and a render in the new one. That checks the work you need to deliver, rather than treating a familiar theme and a ticked add-on checkbox as proof of a successful update. The controls below follow Blender 5.2 LTS.
Choose the update route for your installation
Blender's installation manual confirms that the application has no built-in update system. Updating extensions inside Preferences updates those extensions, not Blender itself. You won't find a native Help › Check for Updates command in this version.
| Your installation | How to update it | To retain a separate old app |
|---|---|---|
| Windows installer | Download and run the installer for the intended release and CPU architecture. | Use a separate official ZIP folder for the second version. |
| Windows ZIP | Extract the new ZIP into a new folder and launch its executable. | Keep the old folder intact. |
| macOS disk image | Open the new DMG and copy Blender.app into Applications. | Rename or relocate the old app before copying. |
| Microsoft Store | Let the Store apply its Blender update. | Add an official ZIP installation for a fixed older version. |
| Steam | Let Steam update the selected Blender branch. | Add an official archive or DMG outside Steam. |
| Linux archive | Extract the new archive into its own folder. | Keep the old folder intact. |
| Snap or a Linux distribution package | Use that package system's update route. | Add an official archive separately. |
If you have several copies, launch the one you intend to update from its folder or client first. A desktop shortcut or double-clicked .blend can open another installation. Check the running version before changing or removing anything.
Back up the program, settings and project as separate things
First save open work and quit Blender. Keep the old installer, archive or application available, then copy the old version's settings folder to a separate backup location. The Preferences manual recommends backing up your configuration; the folder paths are listed below.
Back up the project folder too, including external textures, linked libraries and other dependencies wherever you keep them. The settings folder isn't the project, and a rendered PNG or movie isn't a substitute for the editable .blend. Our first-scene example separates the .blend from its finished image.
Blender can keep external resources packed inside the file or referenced by path. Preserve the surrounding folder structure for relative paths. If a project depends on a shared asset library, network location or simulation cache, include that dependency in the backup plan rather than assuming copying one .blend has captured everything.
For an add-on you need to finish the job, note its name, installed version and supplier before migrating. Keep its original installation package or download access. This is especially useful for a legacy add-on that won't receive updates through an extension repository.
A maintenance update and a new release line need different checks
Open the Blender icon at the left of the Topbar and choose About Blender, or reopen Splash Screen. The About display identifies the running version and build. Use that number to choose the intended download.
- Within one line: 5.2.3 to 5.2.4 is a maintenance update. Both use the 5.2 user directory, so you normally keep the same settings without a cross-version import.
- Between lines: 4.5 to 5.2, or 5.2 to 5.3, changes the version directory. The new line can offer to copy older settings. Its features, compatibility and add-ons need checking separately.
Those directory names follow Blender's versioned user-directory layout. Two maintenance builds in separate program folders can still share one settings folder. A separate executable therefore isn't complete configuration isolation; retain the configuration backup as well.
The LTS download is intended for long projects, with two years of fixes and no new features or API changes. A regular stable release suits a needed newer feature; daily, alpha and beta builds serve development and evaluation. Choose the release your project needs rather than assuming the largest version number is the appropriate target.
Check the compatibility changes for the lines you cross before downloading. Official macOS builds from 5.0 onward require Apple silicon; 4.5 is the last official Intel Mac line. The specific 5.3 entry also raises its minimum macOS version to 13. Check requirements for the exact branch and machine, not a generic hardware list copied from an old tutorial.
For a deadline, I'd defer a feature migration that doesn't solve a current problem. A maintenance fix that resolves the crash blocking delivery can justify updating during the job. In that case, use a project copy, check the relevant fix and run the same verification below before committing the working file.
Update Blender on Windows
Installer download
- Save work and close Blender. Download the intended release from the official Blender download page, selecting x64 or Arm64 to match your processor.
- Run the installer and complete its installation. The Windows instructions specify administrator rights; the installer creates a Start menu entry and associates .blend files with Blender.
- Launch the installed copy and check its About or splash version. For a different release line, continue with preference import below.
If keeping two versions is essential, use the ZIP route for the additional version. Don't rely on an installer replacing or retaining exactly the arrangement you want. Uninstall an unwanted old installer version through Windows Settings after the new setup and rollback files are secure.
ZIP download
Extract the new ZIP into a newly named folder and start the executable there. Keep the existing folder. The same Windows instructions confirm that the ZIP needs no administrator rights and doesn't create a Start menu entry or file association automatically. A ZIP installation becomes self-contained only when you also configure its portable resources; simply using a ZIP doesn't move its preferences beside the executable.
Microsoft Store
The Windows manual states that the Store downloads and installs available Blender updates automatically. Open its copy after the update and check the version. If you also need an older fixed release, keep that as a separate official ZIP installation and choose explicitly which copy opens the project.
Update Blender on macOS
Follow the DMG installation route: quit Blender, open the new disk image and drag Blender.app into Applications. To retain the existing version, rename its app first, for example to Blender 4.5.app, or place it in a different folder. Then copy the new app.
Launch each app deliberately and read its version. Renaming an app is a way to distinguish the program copies; it doesn't rename the versioned settings directory. An Intel Mac needs a compatible 4.5 maintenance download from the official 4.5 archive, rather than an Apple-silicon build from a newer line.
Steam, Linux archives and package-managed installations
Steam
Steam updates Blender through its client, as the Steam installation manual describes. To follow an LTS line, right-click Blender in the Library, choose Properties… › Betas and select the intended available LTS branch. Blender's 5.2 LTS maintenance announcement gives that branch-selection route. The Betas tab also contains these stable LTS choices; selecting the LTS branch isn't a request to use a beta build.
Wait for the client update to finish, launch Blender and verify the version. Changing a Steam branch changes the copy managed by Steam; it doesn't add a second independent installation. Use an official archive or DMG outside Steam if you need both versions available. Steam's Windows and Linux installation also doesn't automatically associate .blend files.
Linux archive
Download the intended Linux archive and extract it into a new folder, retaining the old one. Launch the new executable directly. The Linux manual requires TAR rather than 7-Zip for extracting the archive and permits multiple installations. This route doesn't depend on the Blender version offered by your distribution.
Snap
Snap updates its Blender package automatically. To inspect the available channels on your machine, run snap info blender. A plain sudo snap refresh blender updates the installed snap along its tracked channel; Snap's refresh command documents the channel behavior and override.
The Blender Foundation's Snap package offers LTS tracks, including 5.2lts/stable and 4.5lts/stable. After checking that your intended track is available, this selects the 5.2 LTS track and refreshes the installed copy:
sudo snap refresh blender --channel=5.2lts/stableThat switches the managed installation; it doesn't create a parallel 5.2 app. A retained official archive gives you the separate executable. Read the running version afterwards instead of judging the result from the command alone.
Your distribution's package
Update it with that distribution's package manager. The Linux manual warns that distribution packages can lag behind official releases or omit features such as Cycles GPU rendering. If the required release or feature isn't in that package, use an official archive separately; repeatedly downloading the same distribution package won't change what it contains.
Import preferences on the first launch of a new line
If Quick Setup shows Import Blender 4.5 Preferences, or a button naming another detected older version, choose it when you want to migrate that setup. The import copies preferences, startup files, installed add-ons and extensions. The old directory stays in place.
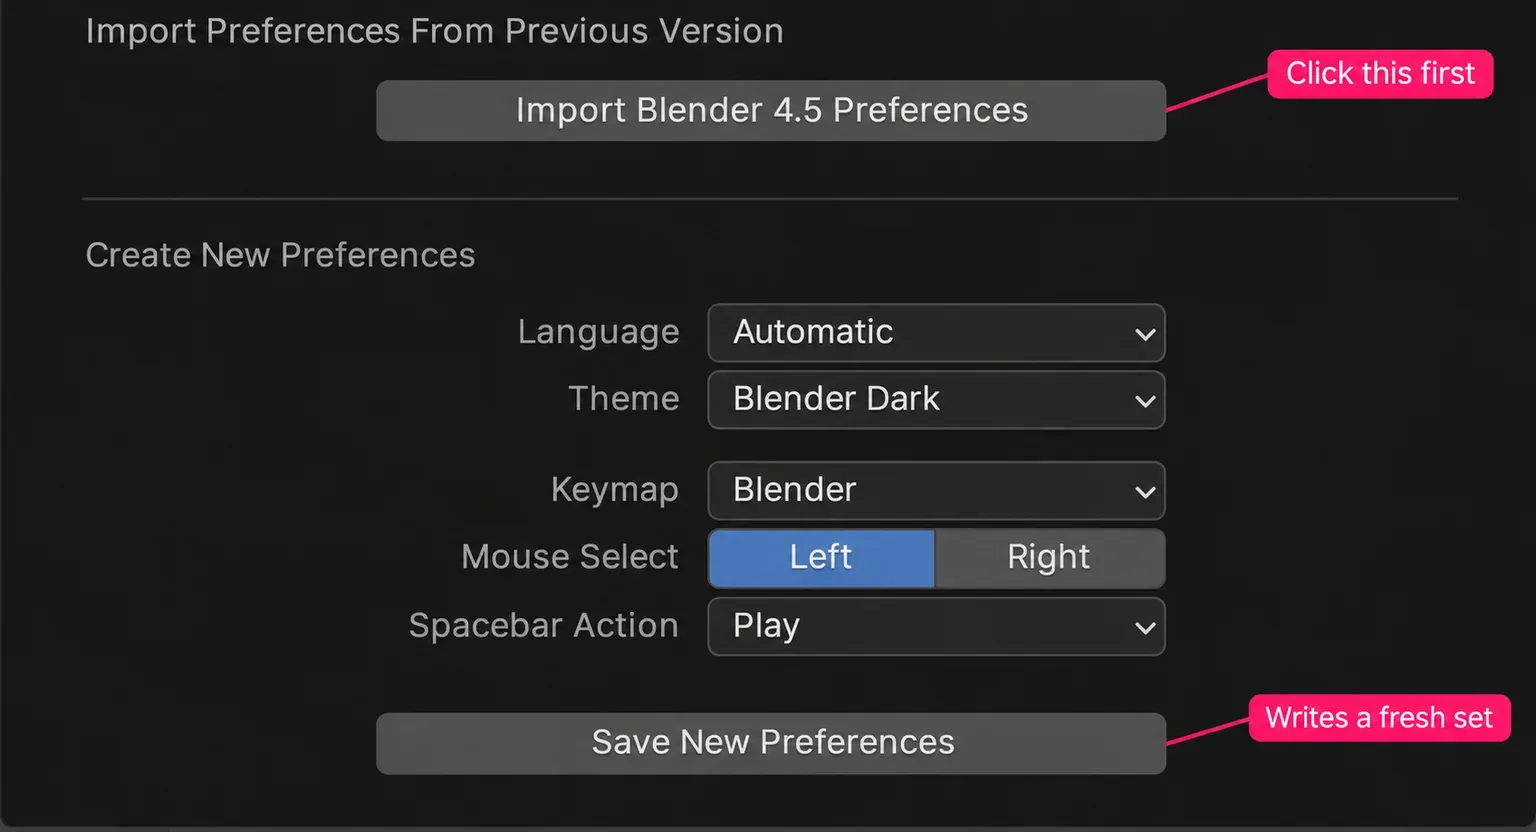
Save New Preferences creates a fresh configuration instead. A Quick Setup panel with only Continue means import isn't available in the current folder state. It doesn't mean your project files were deleted.
In the 5.2 preference-import logic, Blender searches older version directories in the current major cycle, then the previous major cycle, newest first. It uses the first directory it finds. For a 5.2 installation, that can mean a 5.1 or 5.0 folder before a 4.x folder; it isn't restricted to the immediately preceding release. A 3.x folder lies outside that automatic search.
A successfully copied configuration can still contain an incompatible add-on or theme. Check those separately before declaring the migration complete. For a maintenance build using the same 5.2 directory, no new cross-line import is normally needed.
Know which settings folder you're copying
The default 5.2 locations are:
| System | Versioned user directory |
|---|---|
| Windows | %USERPROFILE%\AppData\Roaming\Blender Foundation\Blender\5.2\ |
| macOS | /Users/$USER/Library/Application Support/Blender/5.2/ |
| Linux | $HOME/.config/blender/5.2/, or $XDG_CONFIG_HOME/blender/5.2/ when that variable is set. |
Replace 5.2 with the relevant release line. Inside it, config/userpref.blend stores preferences and config/startup.blend stores the startup scene and layout. Extensions, legacy scripts and presets occupy their own subdirectories. Copying the complete version directory preserves more than copying userpref.blend alone.
The portable layout uses a folder named portable beside the executable on Windows and Linux, or inside Blender.app/Contents/Resources on macOS. Environment variables can also relocate user resources. For either arrangement, back up the actual configured directory; the default path table may not describe your setup.
Recover a missed import without deleting either setup
If you created fresh preferences and then wanted the older ones, stop before copying files over the new setup. Under the standard configuration path, use this reversible sequence:
- Save the project, quit the new Blender and make a backup of both version directories.
- Rename the new version directory, for example from
5.2to5.2-fresh-backup. Keep the older directory in its original location. - Start the new app again. If it finds a supported older directory and its configuration path permits import, choose the import button.
- Keep the renamed fresh directory until the imported setup works. It contains any new preferences you had already made.
The import button and the existence of usable old preferences are different checks. The source logic gives these conditions:
| Folder state | Import offer in 5.2 | What that tells you |
|---|---|---|
| No supported older directory is found. | Unavailable. | There is no detected configuration to copy. |
| An older directory exists; the new directory doesn't. | Available under the standard configuration path. | The offer alone doesn't prove the old userpref.blend exists. |
| Both directories exist. | Requires an old config/userpref.blend and no new config/userpref.blend. | A saved new preferences file can prevent the offer. |
| The active CONFIG path is outside the new version user directory’s config folder. | The automatic import is disabled by the path check. | Renaming a default-path folder won't change that active custom path. |
Renaming the new directory can expose the import again; it cannot recreate a missing old preferences file. If the older file is gone, restore its backup. Otherwise migrate the surviving pieces: export the keymap, reinstall compatible add-on packages and set the remaining preferences again.
For a keymap-only move, use Edit › Preferences › Keymap › Export in the old version and Import in the new one. The keymap preset instructions distinguish a full export from modified shortcuts only: disable All Keymaps for the latter. Keep the resulting .py preset with the configuration backup.
Check add-ons, extensions and themes after import
For a repository-managed extension, open Edit › Preferences › Get Extensions. Use Refresh Remote to check online repositories, then install the relevant compatible update. The Extensions manual describes Update All and the optional startup update check. Remote checks need online access; a package installed into a local repository from disk doesn't acquire remote updates automatically.
For a legacy add-on, obtain a release supporting the target Blender version from its supplier. In Add-ons, use Install from Disk for its .py or ZIP package, then enable it. The legacy installation instructions say installation doesn't enable it automatically. Check any add-on-specific preferences and perform the operation you rely on.
If scripts live outside the version directory, check Preferences › File Paths › Script Directories. Blender's script-path instructions require the appropriate subfolder structure and a restart. Copying a directory name into Preferences isn't proof that its add-ons have loaded.
A theme is another dependency. The 5.0 compatibility notes explain that older custom themes need updating for the changed theme API. Keep the original theme files and use a compatible version; check the editors you use rather than assuming a familiar background color means every control remains readable.
If imported preferences cause startup errors, save work before resetting anything. The Defaults manual recommends factory settings as an initial diagnostic. For preferences alone, use Load Factory Preferences from the Preferences menu; File › Defaults › Load Factory Settings also resets the startup scene and interface. The Preferences instructions explain that factory preferences disable autosave for that session, so a deliberate Save Preferences is needed to replace the stored setup. Preserve the backups while isolating the problem.
Make sure the intended version opens your files
Two different release lines can keep separate versioned preferences. A changed file association can still send every double-clicked .blend to the newly installed program. To avoid ambiguity during verification, open the intended Blender first and use File › Open.
On Windows and Linux, Edit › Preferences › System › Operating System Settings › Register makes the running installation the default for .blend files and thumbnails. Unregister removes its association; For All Users requires administrator rights. The System manual also notes that package managers such as Snap handle their own association.
On macOS, select a .blend in Finder, choose File › Get Info, pick the intended app under Open with and use Change All when you want that choice for every .blend. Apple distinguishes changing all files from opening one file with a chosen app. Reopen a file and confirm the running Blender version.
Verify the migrated setup on a project copy
Use a small but representative project: one with the add-on, modifier setup, material or linked asset that matters to your work. A default cube can't establish whether a specialized production setup survived.
- Open the backed-up working file in the new app. Confirm its version and read conversion or missing-data warnings.
- Check dependencies. Use File › External Data › Report Missing Files for referenced resources. Inspect important textures and linked assets too; resolving a path doesn't prove it's the intended revision.
- Make one relevant edit. Exercise the add-on operation you need, inspect a critical modifier or Geometry Nodes result, and move through representative animation frames when animation is involved.
- Render a representative frame. Check the intended camera, engine, material appearance and output dimensions against the previous result. For a job whose delivery is an exported asset or movie, check that delivery in its destination as well.
- Save under a new filename. Choose File › Save As, retain the old file and preserve the project dependencies.
- Close and reopen the new copy. Check that the required state and resources load again. Keep the old app and original project until the new workflow is reliable enough for the job.
The external-data commands report and locate missing files; the File menu distinguishes Save As from overwriting the current file. Neither command certifies an entire project, so tie the checks to its actual output.
Go back with the old program and its original project
The most dependable rollback is the old application opening the project it last saved, with its old settings and dependencies. Downloading an older executable doesn't reverse changes already written into a newer .blend.
The manual warns that opening newer files in older Blender can lose features. Saving over that file can make the loss permanent. If you must try the conversion, preserve the newer file and save the older-version result under a different name.

There is also a hard boundary: the 5.0 file-format change requires Blender 4.5 or later to open 5.x files. A 4.5 bridge can read them, but that doesn't preserve every newer feature. The same compatibility notes describe limits involving long data-block names and packed linked data. Don't make that conversion your only backup strategy.
For Steam or Snap, switching back to an older branch changes the managed app. An independent official archive or DMG lets you retain both. If a failed maintenance update shared its settings directory with the old build, restore the configuration backup with Blender closed; merely launching the old executable won't restore overwritten preferences.
Before removing the old installation, confirm three results: the intended version opens the file, the necessary operation and delivery work, and the saved project reopens with its dependencies. Those checks make the update useful; matching a version number alone doesn't.