To move the active camera to a view you've framed, use Ctrl + Alt + Numpad 0, or View > Align View > Align Active Camera to View. To adjust it directly, select the camera in Object Mode and use G to move or R to rotate. To steer it with ordinary viewport navigation, look through the camera and enable Sidebar > View > View Lock > Camera to View.
These controls follow Blender 5.2 LTS and the default Blender keymap. I'd start by aligning a useful viewport view: it gives you a complete first shot before you need to work with camera-relative axes. Then use the navigation lock for visual adjustments or G/R and numeric values for a controlled move.
If you only want to look around a model while leaving the shot alone, use the viewport navigation guide. The camera is a scene object; changing your editing view does not normally reposition it.
Line up a first shot from the viewport
Keep a recoverable version before replacing an existing composition. File > Save Copy preserves the current file as a separate copy; Save Incremental saves under an incremented name. For an existing rig or animated camera, check what drives its transforms before changing it.
- Choose the camera in Object Mode. Select its name in the Outliner. If there isn't one, use Add > Camera in the 3D Viewport. Keep the pointer over that viewport when using its shortcuts.
- Make it the scene's active camera. Press N to open the Sidebar, then go to View > View and turn off Local Camera first so the next assignment affects the scene's render camera. Then choose View > Cameras > Set Active Object as Camera, or press Ctrl + Numpad 0. This also switches into its view. The scene's active camera is used for rendering; selecting a different camera alone doesn't change that assignment.
- Leave camera view. Press Numpad 0, or click the navigation gizmo's camera button. Select the subject and choose View > Frame Selected, or Numpad ., the decimal key on the numeric keypad. This frames the subject in your editing view.
- Choose the angle. Orbit with middle-drag, pan with Shift + middle-drag and zoom with the wheel. Without a middle button, drag the corner navigation gizmo's colored axes, hand and magnifier. Stop when you have a useful view of the subject.
- Align the active camera. Choose View > Align View > Align Active Camera to View, or Ctrl + Alt + Numpad 0. The subject can remain selected: this command changes the active camera, not whichever object you selected to frame.
- Inspect the camera frame. If you're not already looking through it, use View > Cameras > Active Camera. Check the subject inside the dashed frame. In camera view, Home, or View > Cameras > Frame Camera Bounds, fits that frame to the editor.
The active-camera controls distinguish viewing, selecting and assigning a camera. A visible camera has a solid triangle above it when it is active. You can also choose the scene camera in Properties > Scene > Scene > Camera.
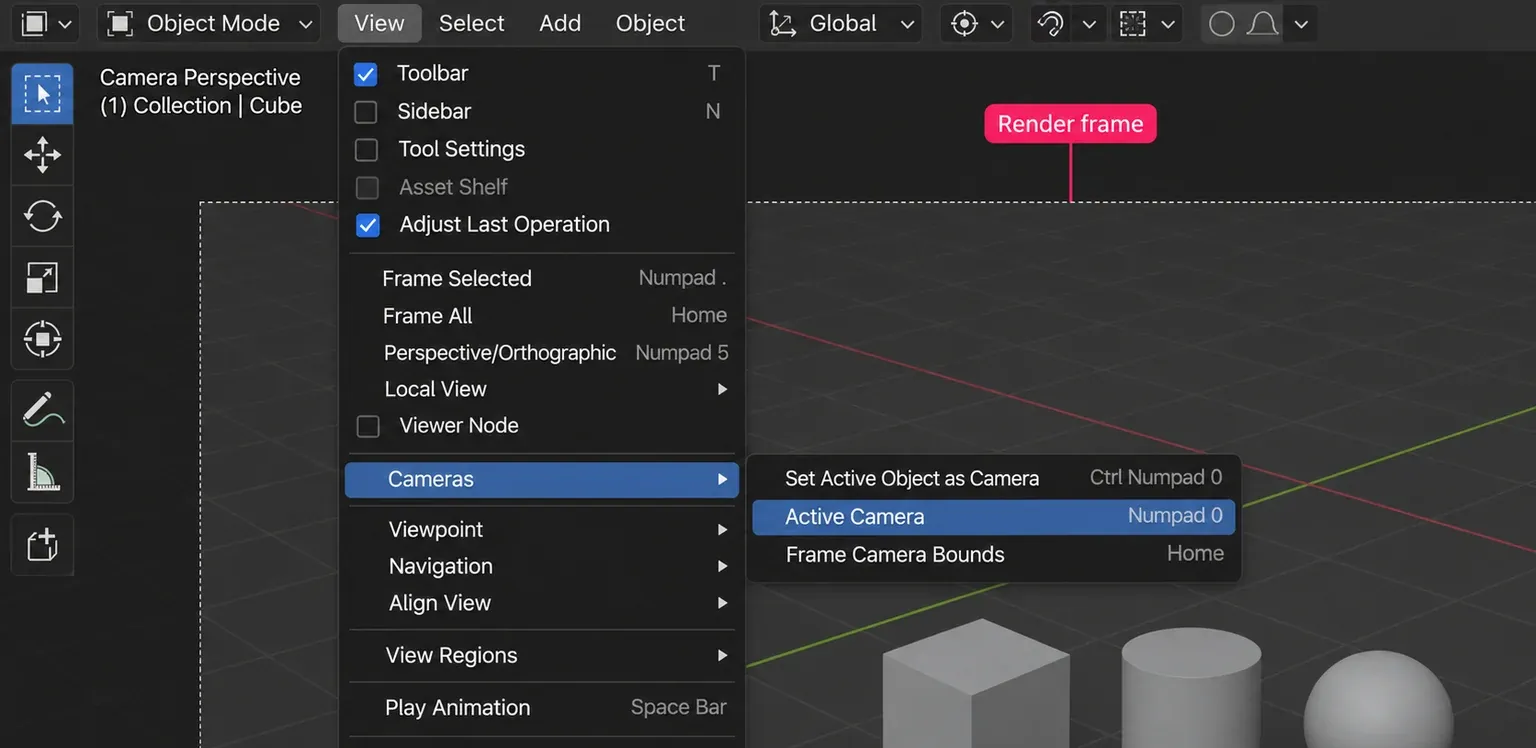
Align Active Camera to View sets position and orientation. It isn't a promise that the viewport's visible edges become the identical render crop. Check the camera's projection and lens, plus the output aspect ratio, before correcting a mismatch. The viewport's own Focal Length in the Sidebar belongs to the editing view.
For a camera that already points in the right direction, View > Align View > Align Active Camera to Selected moves it to center selected objects without changing its orientation. It will not turn a camera toward a subject behind it; use alignment to a chosen view or a tracking constraint when the aim must change.
To aim at a point marked by the 3D Cursor, leave camera view and choose View > Align View > Center View to Cursor. Adjust the angle and distance while keeping that point centered, then use Align Active Camera to View. This centers your editing view first; it does not move the subject or cursor.
Move the camera with orbit, pan and zoom
Camera to View changes the shot as you navigate. Keep your saved composition available, and turn Auto Keying off for a still-camera exercise so adjustments don't add unintended animation keys.
- Look through the intended camera. Use Numpad 0 or View > Cameras > Active Camera if you're outside camera view. Check the scene camera and Local Camera condition from the first-shot steps.
- Open the lock. Press N to show the Sidebar, choose its View tab, then find View Lock. Tick Camera to View on the Lock row. The camera frame gets a red dashed outline. The padlock button under the corner navigation gizmo toggles the same setting in camera view.
- Navigate inside the shot. Middle-drag orbits, Shift + middle-drag pans and the wheel zooms. The corner gizmo provides left-button alternatives. Watch the scene move inside the frame; the camera follows your navigation.
- Finish by unticking Camera to View. The red outline disappears. Leave camera view with Numpad 0 or the corner camera button before exploring the scene freely.
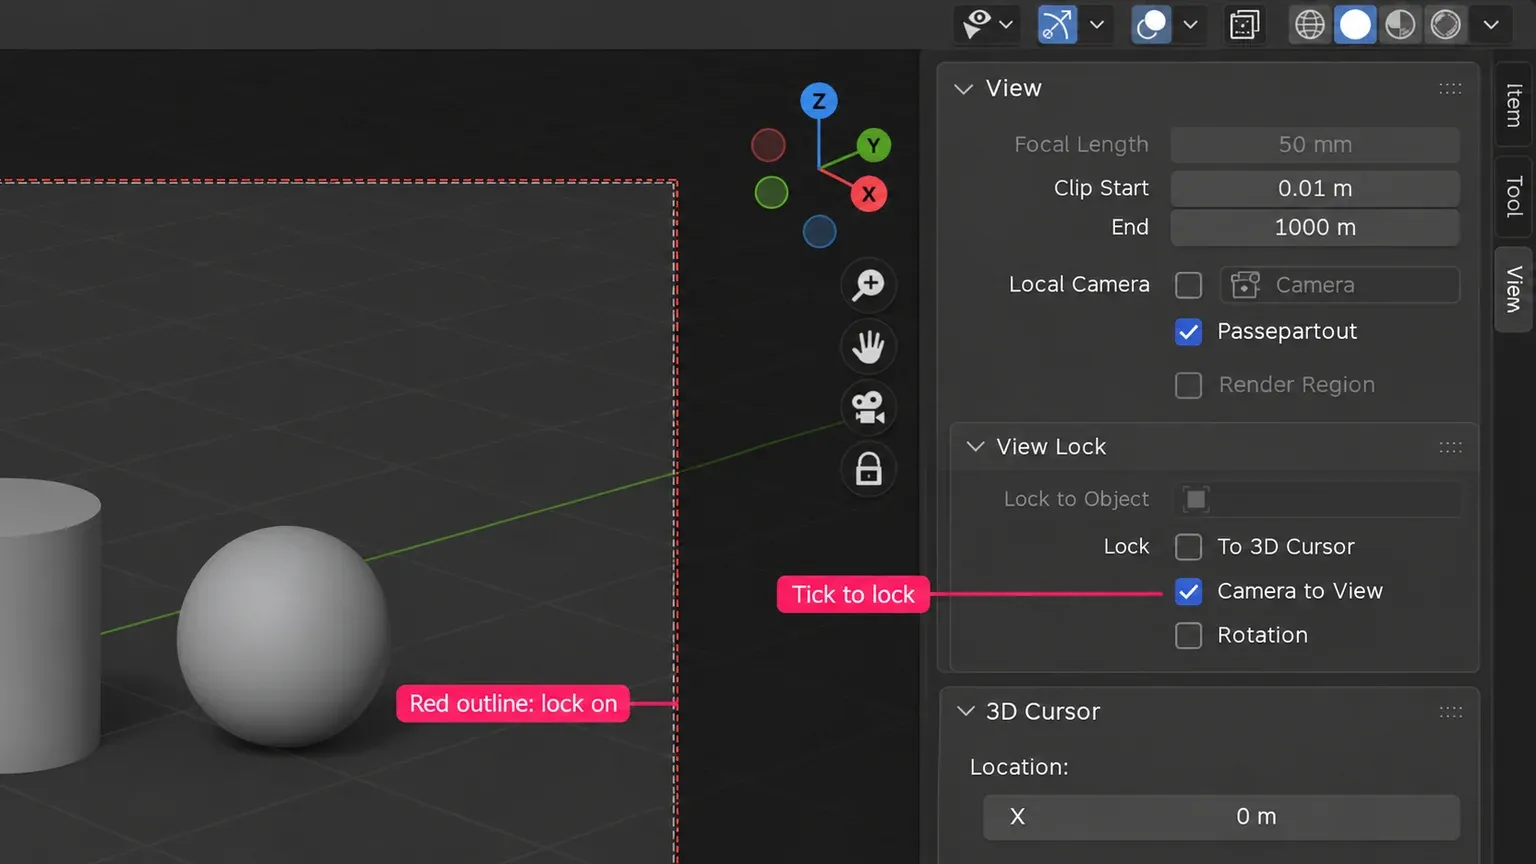
For a plain camera, the Sidebar's Item > Transform values provide a useful check: navigation with the lock changes its position or rotation. An unlocked camera frame can be enlarged on your screen without changing the shot. Frame Camera Bounds and Zoom Camera 1:1 change how you inspect the frame, not the output resolution.
A parented camera has another dependency. With Camera Parent Lock enabled in the camera's properties, this navigation transforms the root parent instead of the camera. The View Lock settings describe that behavior. Check the parent when the shot changes but the camera's local values don't explain the movement.
Move and rotate precisely with G and R
Use Object Mode and select only the camera you intend to move. Select it in the Outliner, or click its dashed frame while looking through it if the camera object isn't hidden. Other selected objects can move with it, so check the selection before starting.
G, or Object > Transform > Move, starts a translation. R, or Object > Transform > Rotate, starts a rotation. Move the pointer, then left-click or press Enter to confirm; Esc or right-click cancels the active transform. You can also type Location and Rotation in Sidebar > Item > Transform.
Set the viewport header's Transform Orientation to Global for the combinations below. Set Transform Pivot Point to Median Point when rotating: with only the camera selected, the pivot is its own origin. A 3D Cursor pivot can make the camera orbit that cursor instead. A single X, Y or Z after G/R uses a world axis; repeating that axis switches to the camera's local axis. The axis-locking rule changes with the chosen orientation: if you begin in another orientation, the second press uses Global. Read the axis named in the header when a move goes in an unexpected direction.
| Move | Keys and result |
|---|---|
| World up or down | G, then Z. Move along the scene's vertical axis. |
| Slide without changing height | G, then Shift + Z. Move in the world's X/Y plane. |
| Dolly toward or away from the subject | G, Z, Z. Move along the camera's viewing axis. |
| Track across the shot | G, X, X for camera-local horizontal movement; G, Y, Y for camera-local vertical movement. |
| Pitch up or down | R, X, X. Rotate around the camera's local X axis. |
| Yaw left or right | R, Y, Y. Rotate around its local Y axis. |
| Roll the frame | In camera view, R rotates around the viewing axis. R, Z, Z explicitly constrains rotation to the camera's local Z axis. |
These camera-relative moves are easiest to judge while looking through the selected camera. Use a small amount appropriate to the scene, then check the frame. With Median Point and a single camera selected, a pitch or yaw changes the direction from the camera's current position.
For an exact world-height adjustment, press G, Z, 1, Enter to add one scene unit in Global orientation. Numeric input accepts values after the axis constraint; the appropriate distance depends on your scene units. Pressing R twice starts free trackball rotation, which is useful for loose aiming but can introduce a tilted horizon.
Choose between a dolly and changing the lens
A dolly moves the camera. Moving closer changes where the scene is viewed from, including the relative appearance of foreground and background objects. Changing Focal Length on a perspective camera changes the field of view from its current position. Those actions can make a subject occupy a similar amount of the frame while producing different perspective.
In Properties > Camera > Lens, a longer focal length shows a narrower field of view; a shorter one shows more of the scene. I'd choose the viewpoint for the relationship between objects, then adjust the lens for the crop. That keeps a foreground object from changing size relative to the background merely because you needed a tighter frame. The camera lens settings also explain the separate Orthographic Scale control.
With an Orthographic camera, distance does not make objects appear smaller. Change Orthographic Scale to change how much fits in the image; moving it still changes its position and can affect clipping or which geometry lies in front. Scaling the camera object with S changes its viewport visualization, not the rendered framing.
For architectural framing, consider Lens > Shift after choosing the camera's orientation. Shift moves the off-center framing without tilting the camera; the manual shows how this preserves line directions that camera rotation would skew. Passepartout and Composition Guides under Viewport Display help judge the frame without moving anything.
Use WASD to position the camera
Start from camera view. Walk or Fly started there moves the camera even with Camera to View unticked. Started outside it, the same controls navigate your editing view. This camera-view condition matters more than whether the camera happens to be selected.
With the pointer over the 3D Viewport, use View > Navigation > Walk Navigation. Shift + ` starts the method selected in Preferences > Navigation > Fly & Walk > View Navigation. The symbol is the grave accent, not the apostrophe; use the menu when your keyboard layout makes it awkward.
- Look: move the mouse. Travel: W/S move forward/backward, A/D move sideways; the arrow keys are alternatives.
- Change height: E goes up and Q goes down along the world vertical when Gravity is off. Tab toggles Gravity. The Status Bar lists the available controls.
- Control speed: roll the wheel or use Numpad +/−. Hold Shift to move faster or Alt to slow down temporarily.
- Keep the new position: left-click. Return to the starting position: Esc or right-click.
I'd use Walk for moving through a room because the mouse sets your viewing direction while keys control travel. Fly Navigation, in the same menu, uses a safe rectangle and acceleration: move the mouse outside the rectangle to steer; W/S/A/D and E/Q accelerate. Left-click or Spacebar accepts; Esc or right-click cancels. Its wheel changes acceleration, and middle-drag pans while flight is paused. The Walk/Fly controls give the remaining gravity, teleport and orientation options.
Position a camera without a numpad or middle button
The View > Cameras and View > Align View menus cover viewing, assigning and aligning a camera. G and R need neither a numpad nor a middle button. Use these routes first if you want to preserve the normal number-row keys for mesh editing.
In Edit > Preferences > Input > Keyboard, Emulate Numpad makes the number row act as the numpad. Then 0, Ctrl + 0 and Ctrl + Alt + 0 correspond to the three camera shortcuts above. The tradeoff is losing those keys' normal jobs, including vertex, edge and face selection in Edit Mode.
Input > Mouse > Emulate 3 Button Mouse lets Alt + left-drag substitute for middle-drag; Shift + Alt + left-drag pans. It takes over some Alt editing operations. On macOS and Linux, the Modifier can use OSKey instead; that choice is unsupported on Windows. These Input preferences and their limitations apply to the camera lock's navigation too.
On Apple keyboards, Alt is Option and OSKey is Command; Control remains Control. Native touchpad gestures and the left-button navigation gizmo are described beside their controls in the viewport input guide. Keep the pointer over the viewport when trying a shortcut: the same key can do another job over the Timeline.
Keep the camera aimed at a subject
Use a tracking constraint when the camera should keep looking at a target as either one moves. An empty gives you an aim point you can move independently of the subject's object origin. It has no renderable geometry.
- In Object Mode, use Add > Empty > Plain Axes. Move the empty to the point the camera should look at.
- Select the camera. In Properties > Object Constraints, choose Add Object Constraint > Track To.
- Set Target to the empty, Track Axis to -Z and Up to Y. Set these explicitly so the camera's viewing direction follows the target.
- Look through the active camera. Move the camera with G to choose its viewpoint; move the empty to change its aim. Check that the target stays at the intended place in the shot.

The Track To axes must be different; choosing the same Track Axis and Up axis disables the constraint and turns its icon red. If the camera sits almost directly above the target, the roll can become unstable. Damped Track is the documented alternative for that case.
The constraint now drives rotation, so ordinary R adjustments may not change the visible aim. Move the target or use the intended rig control. I'd keep the empty as a separate aim point because that lets you reframe a face or detail without moving the model itself.
If you use Object > Track > Track To Constraint, select the camera first and the target empty last: the active object becomes the tracking target. Object > Constraint > Add Constraint (with Targets) uses the reverse ownership: the active object receives the constraint. The Properties route above avoids mixing these selection orders.
Find what prevents a move or brings the old shot back
Diagnose the dependency before deleting keys, constraints or a parent. Keep a saved copy and change one thing at a time. Clearing everything can destroy a working camera rig while leaving the original cause unexplained.
| Symptom | Check and next action |
|---|---|
| The model moves instead | Check Object Mode and the selection in the Outliner. Select only the intended camera before G/R; undo the accidental object move. |
| G/R cannot change one axis | Check the padlocks beside Location and Rotation in Item > Transform. An intentional lock may protect a rig; release only the channel you intend to edit. |
| Numbers change but the camera stays put or keeps the same aim | Inspect Object Constraints and the target. On your recoverable copy, temporarily disable the relevant constraint or set its Influence to zero. Check which transform it was driving, then restore it if the rig needs it. |
| The pose returns when the frame changes | Look for keyed camera or rig transforms. Change the intended keys or use its animation controls; a manual move between evaluations does not replace the existing animation. |
| The shot changes after you finish framing | Untick Camera to View and inspect Auto Keying. For a parented camera, also check the root parent's movement and Camera Parent Lock. |
| Another angle renders | Check the scene's active camera at the current frame. Turn off an unwanted Local Camera override in the viewport; inspect camera-bound markers if the scene contains cuts. |
Transform locks restrict interactive changes, while constraints can supply a separate visual transform. A disabled constraint keeps its settings available. Deleting it loses them. For a deliberate conversion to a freely positioned camera, Object > Apply > Visual Transform can retain the evaluated pose before constraints are disabled or removed; check the result on a copy because a rig may depend on several relationships.
Alt + G and Alt + R do not restore a previous shot. Object > Clear > Location/Rotation resets those transform values to zero. Parenting, delta transforms and constraints can still affect the world-space result. Use Edit > Undo History for an earlier action in the current session, or reopen a preserved file when you need an earlier composition.
Give the camera a start and end position
For a simple move, choose a start frame, select the camera and place it. Hover over Location and press I; do the same over Rotation. Go to a later frame, move and aim the camera, then key those properties again. Play or scrub between the two frames to inspect the path.
This property-specific route ensures you key the channels you changed. Pressing I over the viewport uses Default Key Channels or an active Keying Set, as the keyframe controls explain. With a tracking rig, animate its intended camera/target controls instead of trying to key an overridden rotation.
To record a hand-steered path, enter camera view, enable Auto Keying, start playback and then enter Walk/Fly. When finished, left-click to leave navigation before stopping playback. Turn Auto Keying off when you're done recording and inspect the saved path. Smooth timing and multi-camera cuts are separate animation tasks; they don't need to complicate a still-shot adjustment.
Check the finished shot against the render
At the intended animation frame, check Properties > Scene > Scene > Camera, then inspect that camera with the viewport's Local Camera override off. Fit the camera frame with Home and use Passepartout to darken the area outside it. Confirm that Camera to View is off before further inspection.
Choose Render > Render Image, or F12, to render the active scene at the current frame. Compare the angle and crop, not the Solid viewport's lighting, with the camera frame. If the wrong angle appears, check the active scene camera and camera-bound animation markers; if the right angle shows only a small rectangle, inspect the render region.
A Render Region drawn in camera view affects the final render. Disable Output Properties > Format > Render Region to check the whole frame. Crop to Render Region changes the output extent; a region made outside camera view is a separate viewport setting. If geometry disappears with camera distance, check the camera's Lens > Clip Start/End, not just the editing viewport's clipping values.
Once the correct camera, frame and crop agree, save the composition. The other camera and rendering guides cover the scene setup around that shot.