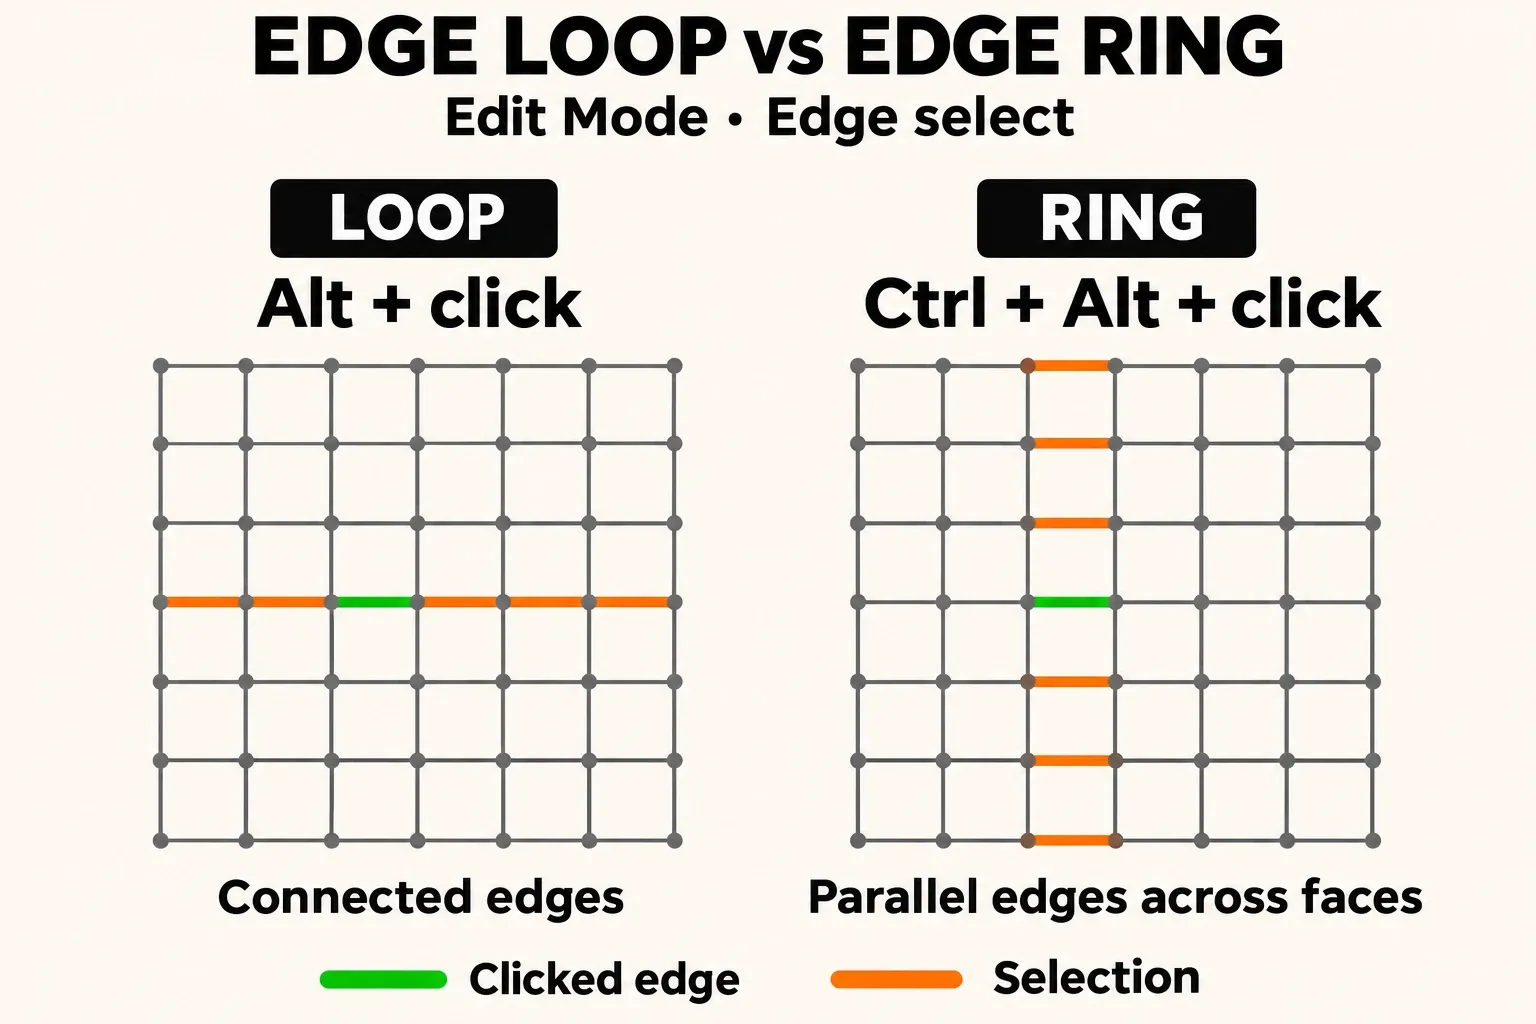
In Blender’s Edit Mode, switch to Edge select and Alt-left-click an edge to select its loop; on a Mac, use Option-left-click. Add Shift to extend or toggle a loop selection, or use Ctrl-Alt-click to select an edge ring. If Alt moves the view instead, the Select menu route gives you a way to finish the selection while you check the input settings.
I recommend starting in Edge select because it makes the direction you clicked easier to see. The important choice is the edge under the pointer: clicking near a vertex can pick the neighbouring edge and send the selection the other way.
Controls: Blender 5.2 LTS, the default Blender keymap and left-click selection. Different presets, right-click selection and mouse emulation have their own shortcut combinations below.
Select your first edge loop
- Select the intended mesh object. Put the pointer over the 3D Viewport and press Tab, or choose Edit Mode from the mode selector in its header.
- Choose Edge select. Click the middle of the three vertex/edge/face buttons beside the mode selector. The default shortcut is 2 on the number row. If Emulate Numpad is enabled, use the button: that preference turns the number row into view-navigation keys.
- Clear any previous selection with Select › None. This makes the result easier to inspect and avoids carrying unrelated edges into the next operation.
- Alt-left-click the middle of an edge that runs along the chain you want. Use Option-left-click on macOS. On a regular quad grid, a horizontal clicked edge selects the connected horizontal chain; a vertical clicked edge selects the vertical chain.
- Check both ends, or the complete circuit. Orbit the viewport to inspect the far side before moving, beveling or deleting anything.
The selected edges should meet end to end. Blender calls that chain an edge loop even when it has two ends and does not close: the manual’s loop definition allows both open and closed chains. “Loop” does not mean “select everything around the object regardless of topology.”
The Edge button also removes a common ambiguity: in Face select, the same Alt-click selects a row of faces instead. The selection-mode controls are the three header buttons, or number-row 1, 2 and 3 for Vertex, Edge and Face in the default configuration.
Edge loop versus edge ring: use the same clicked edge
An edge loop follows connected edges through vertices. An edge ring crosses faces and picks their opposite edges. The edges in a ring can be parallel without touching each other; “ring” does not mean a continuous outline.
| With one horizontal edge under the pointer | Action in Edge select | Result on a regular quad grid |
|---|---|---|
| Follow its connected chain | Alt-left-click | Horizontal edges joined end to end |
| Take the opposite edges across successive faces | Ctrl-Alt-left-click | Separate horizontal rungs arranged vertically |
| Add or toggle another loop | Shift-Alt-left-click | The loop through the clicked edge joins or leaves the selection |
| Add or toggle another ring | Shift-Ctrl-Alt-left-click | The ring through the clicked edge joins or leaves the selection |
Those directions describe the flat grid, not world axes. Bend the grid into a curved surface and the selection follows its connections. The edge-ring definition is the parallel edges in the face row perpendicular to the clicked edge.

Add another loop or remove one
Hold Shift-Alt and click an unselected edge of the next loop to add it. Shift-Alt-click an already selected edge to remove the loop through it. The standard binding uses toggle for Shift-modified loop selection, so repeating the action can undo the selection you just added.
At a crossing, click near the middle of the intended edge, away from the shared vertex. Removing one of two intersecting loops can also remove their shared edge; inspect the remaining selection rather than assuming the other loop is still complete. A plain Shift-click only adds or removes one edge.
Select the row of faces instead
Switch to Face select with its header button, then Alt-click an edge between two faces in the row you want. The face row extends perpendicular to that edge. Shift-Alt-click another unselected row to include it.
If you already have an edge ring selected in Edge mode, a plain switch to Face mode can clear it: opposite edges alone do not enclose complete faces. The supported conversion is to switch to Vertex mode first and then Face mode, or hold Ctrl while clicking the Face select button to expand the selection. This converts the selected ring to its corresponding face row.
Select loops from the menu, without Alt
Use this when a laptop gesture, mouse-emulation setting or window manager is taking the Alt-click. It is also a convenient way to select several loops from a few deliberately picked edges.
- In the mesh’s Edit Mode, choose Edge select and use Select › None.
- Click one edge on the first intended loop. Shift-click one edge on each additional loop.
- Choose Select › Select Loops › Edge Loops. Each picked edge grows into its loop.
Choose Edge Rings in the same submenu for rings. These menu commands start from the currently selected edges, so an accidental extra seed can produce an unwanted extra selection. The current Select Loops submenu also contains Boundary Loops, Loop Inner-Region and Boundary of Selected.

Select the rim of a hole or open border
For an entire open rim, clear the selection, pick one of its border edges and choose Select › Select Loops › Boundary Loops. A boundary edge belongs to only one face; the operator follows the connected boundary from that seed. It can start from one selected border edge on each of several rims.
You can also Alt-click a boundary edge a second time to select its whole boundary after the first loop selection stops. This is useful at corners. It does not make a capped cylinder’s rim an open boundary: those rim edges have a cap on one side and a wall face on the other.
For a different job, Boundary of Selected takes a selected region of faces and selects its outline. Loop Inner-Region selects faces inside a closed selected edge contour. Check that the contour closes before using the latter: with an open loop, the region-selection condition can make all connected faces count as inside.
Why an edge loop stops before it closes
If a connected chain lights up but ends too soon, the shortcut is working. Inspect the last selected vertex and the next face; changing keyboard settings will not create a missing continuation through the mesh.
| What you see | What to inspect | Useful next action |
|---|---|---|
| The chain ends at a junction | Three, five or more edges meeting at the endpoint | Check the pole and choose the next path manually if that is the intended contour |
| The chain reaches the mesh’s outer edge | An open border rather than an interior quad continuation | Use Boundary Loops if the border itself is the target |
| A ring ends at a triangle or n-gon | The next face and Edge Ring Delimit | Keep the default quad-only selection, or deliberately change the n-gon condition |
| The chain ends at previously hidden geometry | Mesh elements hidden with H | Reveal with Alt-H in Edit Mode, clear the reveal selection and try again |
| The chain stops at a seam, sharp mark or border corner | Delimit settings in Adjust Last Operation | Change only the relevant stopping condition and inspect the new endpoint |
| The line looks continuous but selection will not cross it | A split, disconnected overlap or unusual face connection | Inspect the actual vertices and faces before merging or rebuilding anything |
Poles, triangles and n-gons
In a regular interior quad grid, four edges meet at a vertex and the loop can continue through the opposite edge. A pole has three, five or more connected edges; the mesh-structure explanation shows why an ordinary loop cannot choose a unique continuation there. A typical UV sphere makes the distinction clear: a latitude can close around the sphere while a longitudinal chain ends where the meridians meet at a pole.
Triangles and n-gons often introduce those junctions, but “any triangle or n-gon stops every loop” is too broad. Loop selection follows connectivity, not the visual straightness of a line. A triangle corner can still have four connected edges, and native selection has special handling for some n-gon perimeters.
For example, the native n-gon boundary handling can follow the rim of an otherwise unsubdivided cylinder with n-gon caps. Clicking a vertical wall edge on that same topology can leave only that edge selected: its endpoints have three connected edges. Clicking a different seed changes which of those paths Blender can follow.
I would not rebuild sound geometry solely to make Alt-click select an arbitrary contour. For one local operation, manually adding the missing edges or choosing a path between endpoints is often the more controlled choice. If a repeating modeling task needs clean loop flow, then changing the topology has a purpose beyond the shortcut.
Check Delimit before editing the mesh
Immediately after the loop click, open the lower-left Adjust Last Operation panel, or press F9 with the pointer over the viewport. In Edge mode, Loop Select has Delimit; ring selection has Edge Ring Delimit. Face-mode loop selection has Face Loop Delimit.
The 5.2.3 loop-operator defaults enable Outer Corners and N-gons for ordinary edge-loop selection. Those corner/n-gon controls affect boundary walking; unticking them does not turn an interior pole into a regular four-edge vertex. Boundary Loops starts with no delimiters, which is why it can be the better command for a complete rim.
Seam and Sharp can restrict the selection at marked boundaries. If that explains an unwanted stop, untick the relevant condition and inspect the result. A repeated plain loop click can cycle between a delimited selection and the whole available loop; changing the explicit setting is easier to track when diagnosing a model.
For rings, N-gons is enabled by default and keeps the walk to quads. With it disabled, the ring can cross even-sided n-gons, but it still cannot find an opposite edge across a triangle or another odd-sided face. The loop and ring delimiter update introduced these controls in Blender 5.1, so older tutorials can show a different redo panel.
Geometry behind the visible surface and geometry hidden with H are different cases. A loop can continue around the back of the object; hidden mesh elements are excluded from its walk. Use orbiting or X-Ray to inspect the far side. Revealing hidden geometry helps with an actual hidden-element break; X-Ray cannot repair a pole or a disconnected edge.
When Alt-click selects nothing or moves the view
Start with the mode selector: the mesh must be in Edit Mode, and Edge select gives the edge result described here. Then try the menu command from one selected edge. If that grows a loop but the click does not, investigate the input path before altering the mesh.
Emulate 3 Button Mouse is taking Alt-click
Open Edit › Preferences › Input › Mouse. With Emulate 3 Button Mouse enabled and its modifier set to Alt, Alt-left-drag acts as a middle-mouse drag and navigates the view. The Input preferences describe this conflict and the alternative OSKey modifier.
With left-click selection, the emulation-specific bindings provide these alternatives:
| Task with mouse emulation enabled | Default Blender keymap, left-click select |
|---|---|
| Select a loop | Double-left-click an edge |
| Add another loop | Shift-double-left-click an unselected edge |
| Select a ring | Ctrl-double-left-click an edge |
| Add or toggle a ring | Shift-Ctrl-double-left-click an edge |
Shift-double-click extends a loop selection; it does not have the same toggle behavior as Shift-Alt-click. Double Click Speed in the same Mouse panel sets how quickly the two clicks must follow each other.
On macOS or Linux, I recommend trying Modifier: OSKey if you want to keep mouse emulation and recover the Alt loop shortcuts. On macOS this is the Command key for emulating the middle button; Option remains the Alt key for selecting loops. The modifier choice is unsupported on Windows, where the double-click or menu route avoids the conflict. The wider navigation trade-offs are covered in setting up Blender viewport navigation.

Right-click selection, Industry Compatible and Linux
In Edit › Preferences › Keymap, check the preset and Select with Mouse Button. With right-click selection in the Blender preset, the loop shortcut is Alt-right-click and the ring shortcut is Ctrl-Alt-right-click. The emulation double-left-click table above is specifically for left-click selection.
In the Industry Compatible preset, Alt-left-drag orbits the view. Double-left-click selects a loop, while Alt-double-left-click selects a ring. Shift adds to either selection; Ctrl-double-click deselects a loop, and Ctrl-Alt-double-click deselects a ring. These are preset bindings, not the default Blender shortcuts with one modifier swapped.
If an entire Linux window moves or resizes, the window manager may be intercepting Alt plus the mouse button before Blender receives it. The Linux Alt-mouse instructions explain moving that window-manager modifier to Super/Meta. That changes the desktop’s window gestures across applications, so use the Select menu first if you want to leave those gestures alone.
For a custom layout, use the Keymap search filter set to Name and search Loop Select or Edge Ring Select. Switch to Key Binding to inspect the action assigned to a particular input. The keymap editor’s filtering and event controls let you check the mouse button, event, modifiers and operator properties without resetting your entire setup.
Select only part of a loop
If you need a section between two endpoints, choose Edge select in Edit Mode. Start with Select › None, click its first edge, then Ctrl-left-click its last edge. In the default Blender keymap this invokes Shortest Path, which selects a route between the two elements.
The shortest route is not necessarily the contour you had in mind, especially around poles or across a connected alternate route. Inspect it before editing, use an intermediate endpoint to steer the selection, or Shift-click the few remaining edges manually. In Adjust Last Operation, Topology Distance chooses by the number of crossed edges rather than their geometric distance. Industry Compatible uses different path keys, so the menu route remains the preset-independent option.
Verify the selection before the next operation
Orbit to see the entire selection. For an additional check, open the arrow beside Show Overlays in the viewport header and enable Statistics. With only the intended mesh in Edit Mode and unrelated selections cleared, compare the selected vertex and edge counts.
| One simple selection | Example edge count | Example vertex count |
|---|---|---|
| One closed, unbranched loop | 8 | 8 |
| One open, unbranched chain | 8 | 9 |
| Eight separate ring edges sharing no vertices | 8 | 16 |
These are connectivity examples, not required mesh sizes. An open simple chain has one more vertex than edges; a simple closed chain has equal counts. Separate rungs each contribute two vertices. Intersecting loops, branches, shared ring vertices or additional selected geometry invalidate these shortcuts, and matching counts alone do not prove that the intended contour is selected.
Once the selection is right, choose the operation for the task. Ctrl-R adds a new loop cut across a suitable face row; it does not select an existing loop. Bridge Edge Loops joins selected loops with faces, while Grid Fill fills a suitable selected boundary. For reducing an entire mesh’s polygon count, I would compare a duplicate with the Decimate modifier rather than manually choosing loops without a local editing reason.