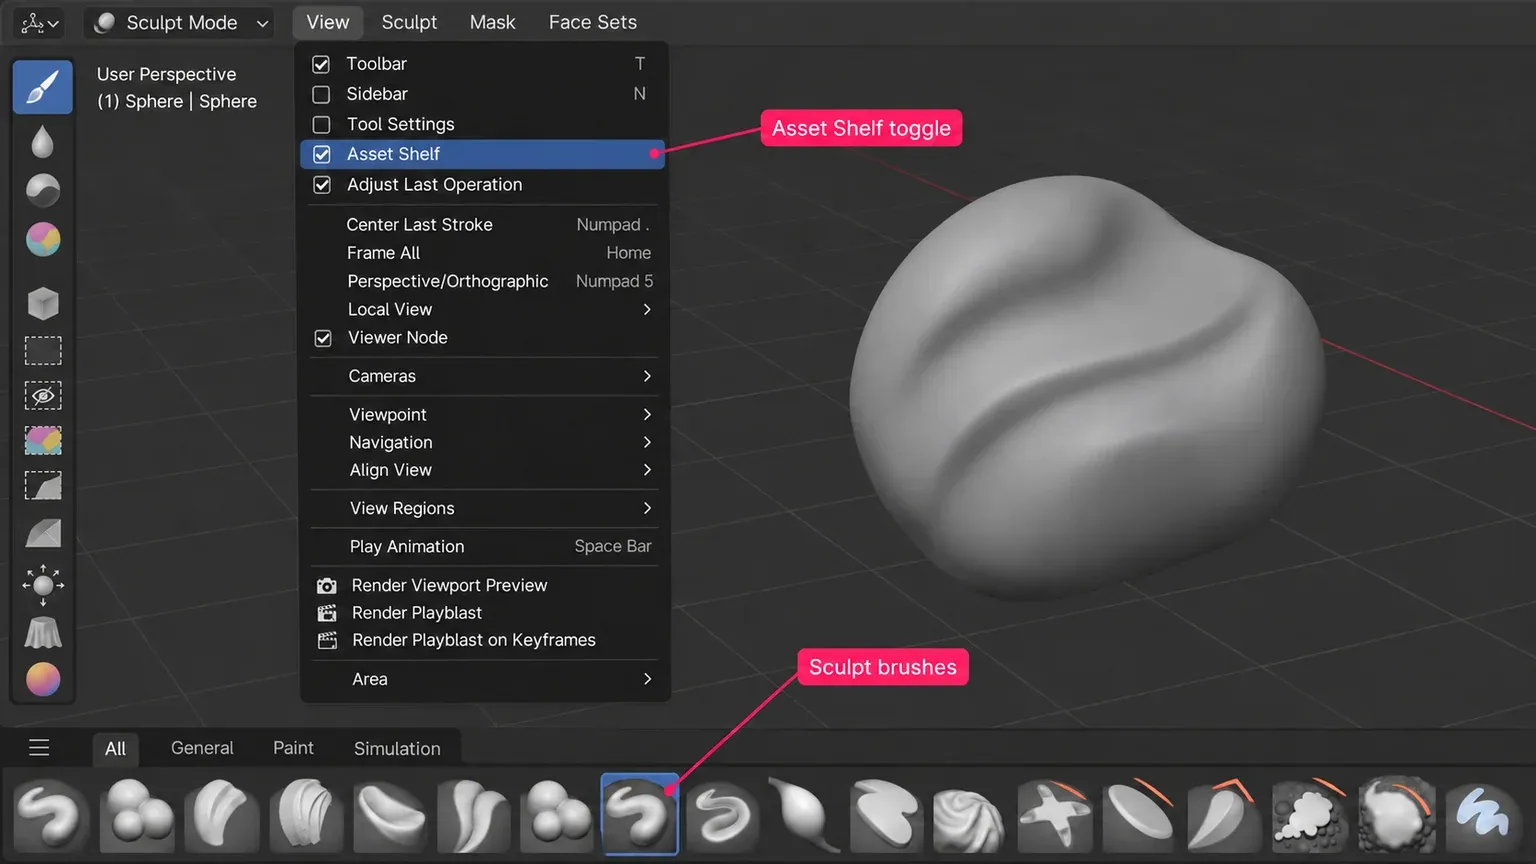
In Blender 5.2, select a brush from the Asset Shelf in the mode you want to use: Sculpt Mode for changing a mesh, Texture Paint for painting an image, or Grease Pencil Draw mode for drawing strokes. If the shelf is hidden, use View › Asset Shelf; Shift + Spacebar opens the brush selector as a popup. I'd start with a built-in Essentials brush and save a duplicate before tuning it, because a new pack won't fix the wrong paint target and unsaved brush settings disappear when Blender closes.
To add a downloaded pack, extract its brush-asset .blend files into a folder registered under Edit › Preferences › Asset Libraries, then return to the matching mode. Choose a pack for its effect, stated Blender version and usage rights. The steps below cover that route and the different conversion needed for older files or brushes from other painting apps.
Choose the effect before choosing a pack
A brush asset combines a brush type with settings such as size, strength, falloff and textures. Clicking its thumbnail activates both the asset and the Brush tool, as the brush introduction explains. It doesn't alter the model until you make a stroke.
| Your intended change | Where to work | A useful starting brush |
|---|---|---|
| Raise or carve the mesh surface | Mesh object, Sculpt Mode | Draw; Clay Strips for rougher, broader volume |
| Move the silhouette or proportions | Mesh object, Sculpt Mode | Grab; use a larger brush for a broader change |
| Reduce surface irregularities | Mesh object, Sculpt Mode | Smooth; it averages vertex positions and can shrink volume |
| Paint or blend an image texture | Texture Paint, in the 3D Viewport or Image Editor | Paint Hard/Soft for color; Blur to soften; Smear to drag existing color |
| Blend color attributes on a sculpt | Sculpt Mode, with the intended color attribute | Blend Hard/Soft or Blur from the painting brushes |
| Draw lines rather than deform a mesh | Grease Pencil object, Draw mode | A pen, pencil or other brush from that mode's shelf |
The Essentials sculpt brush descriptions distinguish geometry brushes from color-attribute brushes. Smooth changes the surface; Blur changes painted color. In Texture Paint, the Soften brush type supplies Blur, while Smear carries color along the stroke. Those are different answers to “which Blender brush blends?”
For shape work I'd establish the form with Draw or Grab before adding a skin, rock or fabric stamp. A detailed alpha needs geometry capable of holding that detail, and a convincing stamp can't repair the underlying silhouette.
Find the built-in brush you need
Shortcuts here use Blender's default keymap with the pointer over the relevant editor. If the model is out of sight, Frame Selected and orbit around the mesh before judging what the stroke changes.
- Activate the right object and mode. Select your mesh in Object Mode, then choose Sculpt Mode or Texture Paint from the viewport header. For drawing, select a Grease Pencil object and choose Draw mode. The shelf filters brush assets to the current mode.
- Show the shelf. With the pointer over the 3D Viewport, use View › Asset Shelf. In the Image Editor, switch its mode to Paint for image painting. The popup opened by Shift + Spacebar, or by clicking the brush thumbnail in Tool Settings, is another route to the assets.
- Search and read the name. Hover over the shelf and press Ctrl + F, then type part of the name. Clear that search before diagnosing a missing pack. Use catalog tabs to narrow the list; turn on Names in the shelf's display options or hover over a thumbnail for its name.
- Activate the asset. Click its thumbnail, then inspect its name in Sidebar › Tool › Brush Asset. Press N over the viewport if the Sidebar is hidden. A thumbnail being visible isn't the same as that brush being active.

The shelf's search, display and By Active Tool controls explain several apparently missing brushes. By Active Tool hides brushes that don't apply to the active tool. Disable that filter while checking a pack, and drag the shelf's upper border upward if one row is awkward to browse. Its filter preference must be saved manually when Auto-Save Preferences is off.
Brushes moved to the asset workflow in Blender 4.3. An older tutorial may select them from the toolbar or a data-block menu. Follow the current shelf route instead of searching for the old list. For a frequently used brush, right-click its thumbnail and choose Assign Shortcut; that menu also offers Change Shortcut and Remove Shortcut.
Make a custom copy before tuning a brush
Changes to a brush asset are temporary until saved to that asset. Saving the scene isn't a substitute: the brush settings manual says unsaved settings survive opening another file in the same session, but are discarded when Blender closes.
I'd duplicate an Essentials or pack brush before editing it. That keeps the supplied asset intact and gives the copy Blender's managed save controls. Essentials brushes can't be overwritten, and the managed brush operators only edit assets created through Duplicate Asset; those commands can be greyed out for a manually stored library brush.
- Activate the source brush. In Sidebar › Tool › Brush Asset, open the small arrow menu beside the thumbnail and choose Duplicate Asset. Right-clicking its shelf thumbnail opens the same asset menu.
- Give the copy a useful name, such as Broad clay soft edge. Choose a writable Library and Catalog. Entering a new catalog path creates it. If no suitable library is configured, add a local folder below first.
- Confirm. The new copy becomes active and is stored in a managed
.asset.blendfile in that library. Check the Brush Asset panel shows your new name before changing settings. - After tuning, open the same menu and use Save Changes to Asset. Revert to Asset discards unsaved changes; use it only when that's your intention.

Edit Metadata changes the copy's catalog, author and description; Edit Preview Image chooses a thumbnail. Delete Asset permanently removes a managed asset and can't be undone. Read the active brush name and keep a backup of important library files before deleting one.
Tune size, strength and falloff with one controlled comparison
Use a disposable copy of the model and your duplicated Draw brush for this exercise. Work on an unmasked region with enough geometry for the stroke, and keep the same view and zoom. If it barely changes, use the checks in the next section before increasing every setting.
- Set a clear starting point. Open Sidebar › Tool › Brush Settings. Disable Use Unified Size and Use Unified Strength if you want this brush's own values, choose Size Unit View, and enter Size 80 px and Strength 0.3. These are comparison inputs, not ideal settings for every mesh.
- Compare width. Make one short stroke, undo it, change only Size to 160 px and repeat over the same area. Use F for interactive size adjustment, confirming with a click or Return; Esc cancels. Size is the brush's diameter in Blender 5.0 and newer, rather than the radius used in older versions.
- Compare buildup. Return Size to 80 px. Compare Strength 0.3 with 0.6, undoing between strokes. Sculpt strength changes how strongly each stroke step acts; it doesn't promise a fixed displacement in millimetres. Shift + F adjusts strength interactively.
- Compare the edge. Keep size and strength fixed and compare Falloff › Curve Preset Smooth with Constant. The falloff curve controls strength from the centre to the edge; changing it changes the distribution of the effect without requiring another pack.
- Add pressure last. For a pressure-sensitive pen, enable Size Pressure or Strength Pressure and adjust its curve if needed. For a mouse comparison, leave those toggles off where available. Keep the variation that serves the shape, then Save Changes to Asset.
The 5.0 brush changes document the diameter change, pressure curves and per-mode unified values. Grab and several other transform brushes don't show pressure toggles; their absence isn't a broken tablet. Don't double a saved old brush's number automatically: compare the intended visible width. When manually copying a radius value from an older tutorial, the equivalent diameter is twice that value.
Use Unified Size or Strength when several brushes should share a value within the same mode. The individual settings remain underneath the override. If a brush appears to forget its saved size when selected, inspect that toggle before resaving the asset.
Size Unit Scene keeps the sculpt brush's physical size consistent as you zoom; View keeps its size in screen space. For repeating texture stamps, inspect Stroke Method and Spacing too: Space places dabs at intervals, while Anchored creates a single dab that you size by dragging. A dotted trail can be a spacing choice rather than a bad texture.
Check the target when a stroke does nothing
Start with the active object, mode and brush name, then inspect what the brush is allowed to change. Downloading another brush won't create missing vertices, select an image canvas or remove a mask.
| Symptom | Check | Next action |
|---|---|---|
| Only large corners move; fine detail won't appear | The actual mesh density under the stroke | Use a suitably subdivided sculpt mesh, or plan a supported resolution workflow on a backup before detail work |
| A sculpt brush affects only part of the surface | Painted masks and header/brush Auto-Masking settings | Inspect the restricted region and disable the relevant mask for a comparison only if that restriction is unwanted |
| The stroke makes a mirrored copy elsewhere | Sculpt Symmetry › Mirror axes | Turn off the unwanted local-axis mirroring for this operation |
| Texture Paint changes no visible color | UV map and the selected paint image/slot | Select the intended image canvas or material paint slot, and confirm the displayed material uses that image |
| The painted image changes, then returns after reopening | Whether the image itself was saved | Use Image › Save or Save As, or deliberately pack the edited image before saving the blend-file |
| A pen gives almost no effect or an unexpected width | Strength, pressure toggles/curves and unified overrides | Compare the same brush with pressure disabled where supported, then tune one pressure response at a time |
| The desired brush is absent | Mode, search text, catalog, By Active Tool, library path and asset status | Clear filters and verify the pack's assets are available in that exact mode before reinstalling anything |
For sculpting, resolution methods have different consequences. Multiresolution supports subdivision-level sculpting on a suitable base mesh. Dyntopo adds and removes topology under the brush, but can lose or corrupt UVs, color attributes and Face Sets. Voxel remeshing rebuilds topology. I'd preserve the original and choose the method deliberately rather than turn on Dyntopo as a generic brush repair.
A painted sculpt mask protects vertices. Auto-Masking can further restrict topology, Face Sets, boundaries or normals without a visible painted-mask overlay. Unexpected paired strokes come from a different control: Mirror repeats strokes across selected local axes.
In Texture Paint, the Texture Slots panel selects the canvas. For the Single Image route, choose the image and UV map; for Material, select the appropriate detected image slot. The texture-paint workflow requires UVs for painting the mesh and separately saving or packing the edited image. Saving a brush asset saves its settings, not the image you've painted.
Choose a free brush pack with usable terms and files
A free price doesn't establish commercial-use permission or Blender compatibility. These creator listings provide concrete starting points; choose one for the effect you need rather than the largest advertised brush count.
| Pack | What the creator offers | What to check before using it |
|---|---|---|
| Microghost Painterly Blender Brushes | Seven painterly/abstract brushes stored as assets; the creator explicitly permits commercial use and specifies Blender 4.3 | Match the pack's intended painting workflow and mode; retain the creator's terms with the downloaded files |
| CR Basic Brushpack | Eleven texture-paint brushes in a free version, with 4.3 or newer specified | The visible product description doesn't state commercial-use rights; establish those terms before a commercial project |
| VK Gamedev's free sculpt brushes option | A free ten-brush plus two-VDM option labelled updated for 4.3, alongside paid bundles | Select the free option, confirm its actual files and applicable license; the broad product-version range isn't an install instruction for every option |
Keep downloaded .blend files, textures and any catalog file together after extraction. Read the maker's mode and version instructions: the asset workflow arriving in 4.3 doesn't prove that every pack created since then works in every later release. Nor does an older brush file automatically become a working current asset.
Blend Swap's brush category mixes older sculpt/paint packs with unrelated models, version labels and different Creative Commons licenses. Inspect the individual item. An image alpha is a texture used by a configured brush; it isn't by itself a ready-made brush asset. A downloaded executable isn't part of either native file route below.
Add a folder of brush assets to Blender
- Extract the pack to a stable folder. Keep its supplied subfolders and related files together. Don't leave the only copy in a temporary extraction folder you plan to remove.
- Register the folder. Open Edit › Preferences › Asset Libraries and click + beside the library list. Select the folder containing the pack's
.blendasset files. If a library-type menu appears, choose Add Local Asset Library first, then select that folder. - Verify Path. Select the new library in the list and check Path points to the intended folder. Alternatively, place the pack under an existing local library's Path. The library preferences make assets in blend-files within that directory and its subdirectories available.
- Save preferences when required. If Auto-Save Preferences is off, click Save Preferences. The preference-saving controls distinguish that manual branch.
- Return to the intended mode. Clear shelf search and restrictive catalog/tool filters, then activate one of the pack's brushes. Check its name in Brush Asset. Duplicate it before making a personal tuned version.

Adding a library records where Blender should look; it doesn't move the pack into a protected store. Keep that folder available. A library name is just a label; changing it won't repair a Path that points to a removed or relocated folder.
The plus button can open the folder picker directly or show the local/remote type menu. Blender 5.2.3's library controls condition that menu on experimental remote-library support. A remote repository address is a different input from a local pack folder; don't paste a shop page into the local Path field.
If the file contains brushes that aren't assets yet
Use a new working file for conversion, preserving the original download and your project. The Append operation copies data-blocks from another blend-file; it isn't a guarantee that incompatible old brush settings or much newer files can be read correctly.
- Choose File › Append, browse into the source
.blend, open its Brush data-block folder, select the required brushes and confirm. - Set the Outliner's Display Mode to Blender File, expand Brushes, right-click a suitable brush and choose Mark as Asset. Local brush data-blocks must be assets before they can be activated for painting or sculpting.
- Save this working
.blendinside a registered library directory. This is the manual storage workflow. Return to the correct mode, activate the brush and inspect whether its intended settings/textures survived conversion.
If the brushes don't appear or behave correctly, obtain the maker's compatible asset edition rather than assume Mark as Asset repaired a version mismatch. Manually stored assets also have a different editing workflow: create a managed Duplicate Asset copy when you want the save operators described above.
Get Blender's additional online brushes
The bundled Essentials assets work without downloading a third-party pack. Blender 5.2 also supplies additional online Grease Pencil brushes. Their download needs two separate settings:
- In Edit › Preferences › System › Network, enable Allow Online Access.
- In Asset Libraries, select Essentials and enable Include Online Essentials. Save Preferences if automatic saving is off.
- Return to the matching mode. Hover over an online asset and click its download button, then activate the brush once available. Check the active name in Brush Asset.
The remote-library workflow downloads assets to a local cache. Online access being permitted doesn't itself download every brush, and having a file cached doesn't make the creator's original editable. Use a duplicate for your own settings. Custom remote repositories have their own address and setup requirements; they aren't needed to register the local folder above.
Convert brushes from other painting apps only when supported
Import Paint Brushes is a separate extension for .abr, .gbr/.gih, .brushset, .sut and .bundle files. Its listing specifies Texture Paint, Sculpt, Vertex Paint and Grease Pencil modes. It converts pixel-image-based brushes; it doesn't reproduce every engine's behavior or grant rights to the original brush art.
The creator explicitly limits Krita support to Pixel Engine brushes and excludes SVG textures. Parameter-only Procreate brushes without texture images can't be imported. For multi-image brushes, the default is to split them into individual brushes; the image-sequence option relies on the separately named Animated Texture Brush extension.
For supported files, install the extension through Preferences › Get Extensions, then use its entry under File › Import and choose the Blender mode the brush is for. Imported brushes appear only in that mode. Save the converted brushes in a .blend inside a registered asset library for reuse, and verify their asset status in the Outliner if necessary. Retain the original license terms: format conversion grants no extra usage or redistribution rights.
Verify the saved brush in a new session
Save the managed brush changes, save your project, and separately save or pack any painted images. Close Blender, reopen it, start a new file and switch to the same mode. Activate your named copy and check that its catalog, size, strength and intended settings are present; inspect unified overrides if the displayed value differs.
If a whole pack disappears, verify the registered folder still exists and preferences were saved, then clear the shelf filters. If only a tuned brush resets, check that you edited the named managed copy and used Save Changes to Asset. Keep those two failures separate: the first is discovery of stored files, while the second is persistence of your edits.